
Build GUI Calculator In Golang
You'll learn about GUI in this article how you can create gui application using golang's fyne package


In this article you will learn, how you can build a calculator from scratch. We’ll focus on the Go and it’s Fyne package which helps to create GUI based application for every operating system even for mobile so if you want to learn more about Fyne or if you are new to Go then you need to cover Go and Fyne first.
Packages used
The packages we are going to use in this program are mentioned below:
- Fyne for creating GUI and it’s all Components
- GoValuate provides support for evaluating arbitrary C-like artithmetic/string expressions so we can get the result of used expression.
Fyne Package
Fyne is an easy-to-use UI toolkit and app API written in Go. It is designed to build applications that run on desktop and mobile devices with a single codebase.
To develop apps using Fyne you will need Go version 1.14 or later, a C compiler and your system’s development tools. If you’re not sure if that’s all installed or you don’t know how then check out Getting Started document.
Using the standard go tools you can install Fyne’s core library using:
$ go get fyne.io/fyne/v2
Create a file called calculator.go and paste the below code into calculator.go file
GUI calculator code
package main

import (
    "strconv"

    "fyne.io/fyne/v2/app"
    "fyne.io/fyne/v2/container"
    "fyne.io/fyne/v2/widget"
    "github.com/Knetic/govaluate"
)

func main() {
    myApp := app.New()
    myWindow := myApp.NewWindow("Calculator")

    mainResult := widget.NewLabel("")

    mainS := ""
    mainResult.SetText(mainS)

    one := widget.NewButton("1", func() {
        mainS += "1"
    })
    two := widget.NewButton("2", func() {
        mainS += "2"
    })
    three := widget.NewButton("3", func() {
        mainS += "3"
    })
    four := widget.NewButton("4", func() {
        mainS += "4"
    })
    five := widget.NewButton("5", func() {
        mainS += "5"
    })
    six := widget.NewButton("6", func() {
        mainS += "6"
    })
    seven := widget.NewButton("7", func() {
        mainS += "7"
    })
    eigth := widget.NewButton("8", func() {
        mainS += "8"
    })
    nine := widget.NewButton("9", func() {
        mainS += "9"
    })
    zero := widget.NewButton("0", func() {
        mainS += "0"
    })

    clear := widget.NewButton("C", func() {
        mainS = ""
    })

    plus := widget.NewButton("+", func() {
        mainS += "+"
    })

    minus := widget.NewButton("-", func() {
        mainS += "-"
    })

    multiply := widget.NewButton("*", func() {
        mainS += "*"
    })

    divide := widget.NewButton("/", func() {
        mainS += "/"
    })

    #fourth
    equal := widget.NewButton("=", func() {
        expression, err := govaluate.NewEvaluableExpression(mainS)
        if err == nil {
            result, err := expression.Evaluate(nil)
            if err == nil {
                mainS = strconv.FormatFloat(result.(float64), 'f', -1, 64)
            } else {
                mainS = err.Error()
            }
        } else {
            mainS = err.Error()
        }
    })

    #five updating it each time
    go func() {
        for {
            mainResult.SetText(mainS)
        }
    }()

    #creating layout from the given buttons
    myWindow.SetContent(container.NewVBox(
        mainResult,
        container.NewGridWithColumns(3,
            divide,
            multiply,
            minus,
            // plus,
        ),
        container.NewGridWithColumns(2,
            container.NewGridWithRows(3,
                container.NewGridWithColumns(3,
                    seven,
                    eigth,
                    nine,
                ),
                container.NewGridWithColumns(3,
                    four,
                    five,
                    six,
                ),
                container.NewGridWithColumns(3,
                    one,
                    two,
                    three,
                ),
            ),
            plus,
        ),
        container.NewGridWithColumns(2,
            container.NewGridWithColumns(2,
                clear,
                zero,
            ),
            equal,
        ),
    ),
    )
    myWindow.ShowAndRun()
}
Now you have code it's time to build it and run the generated application, below is the command to build the application, one important thing if you want an application you can use then you'll need a png image for your app icon to make command work without icon it'll not work, so it's better to put your icon into same directory, or if you just want it to run not as application then use below command, both commands mentioned below
# no application only build
$ go build .
after build you can run it with this command, it's for windows
$ ./calculator
or
$ go run .
before going to create application you might need to install fyne tool itself as well
$ go install fyne.io/fyne/v2/cmd/fyne@latest
now you can create your own application package
# want to build it and run as application
$ fyne package
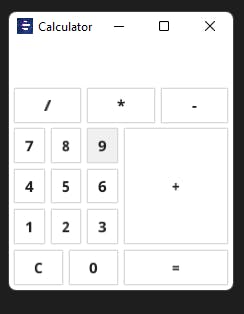
above command will generate the application in the same directory if you double click on the application you'll see your calculator You can as well install your calculator directly into your system with this command:
# install globally into system
$ fyne install
It'll take at least 10-15 seconds to install your app into your system
This article is originally posted on programmingeeksclub.com
If you find this helpful then leave a comment
My Personal Blogging Website : Programming Geeks Club
My Facebook Page : Programming Geeks Club
My Telegram Channel : Programming Geeks Club
My Twitter Account : Kuldeep Singh
My Youtube Channel: Programming Geeks Club